Jul 30, 2009
Fabulously Fresh
Summer brings many beautiful things. One of which being the gorgeous, fresh fruits and vegetables harvested by local farmers and gardeners. Red tomatoes sparkling with drops of dew, vibrant colanders in kitchen sinks, filled with green beans ready to be trimmed and juicy strawberries fresh from the plant are a few of my personal favorites. Taste is another aspect of fresh-from-the garden produce that can't be overlooked. I can't quite put my finger on it, but there seems to be an additional layer of flavor that is missing from that cellophane-wrapped bag of carrots I purchase at the supermarket. Having access to farm or garden-fresh produce is worth taking advantage of.
One way in which to go about acquiring the freshest produce is by paying a visit to your local farmer's markets. My husband and I are planning a trip to ours this Saturday morning. I have plans to purchase fresh fruits and vegetables that will take starring roles in some of next week's recipes.
Another great tool I recently came across is a website called Pick Your Own. This site provides information on local farms and gardens that allow patrons to visit and pick their own produce (i.e. berries, sweet corn, etc.). Choose your state and a list of local opportunities unfold in front of you. Planning a trip to a local farm for some berry picking would be a great family outing or even date!
Here is hoping you take advantage of some fabulously-fresh finds for your kitchen.
Beautiful photo of tomatoes courtesy of FreePhotosBank.com
Jul 28, 2009
Creamy Cucumber Salad
This year my husband and I planted our first garden. This recipe is a result of an overabundance of cucumbers from said garden. When I created this recipe I was looking for something simple, pretty and light, as well as something that would showcase the cool, crisp flavor of the vegetable. Creamy Cucumber Salad looks beautiful displayed on a bold platter, garnished with a little fresh dill.
Ingredients
2 large cucumbers, sliced (any variety, but I used English)
1/2 cup fat free or light sour cream
1/2 cup light salad dressing (such as Miracle Whip)
2 tbsp. vinegar
2 tsp. dried dill
1 tsp. all-purpose seasoning
Salt and pepper to taste
Directions
Combine sour cream, salad dressing, vinegar, dill, all-purpose seasoning, salt and pepper in a bowl, mixing until smooth . Add liquid mixture to sliced cucumbers . Toss well . Serve chilled
Classic Meatloaf and Dill Potatoes
The recipe for this Classic Meatloaf comes straight from my kitchen. I've been making it for years and it never fails. It is a simple recipe and--in my opinion--doesn't need a sauce to accompany it. I've paired it tonight with a side of Dill Potatoes--a recipe I adapted from the dish my mother prepared in the summertime.
Classic Meatloaf Ingredients
Serves 3 to 4
1 pound 93 percent lean ground beef
1 egg (lightly whisked to incorporate easier)
1/2 cup chopped onion
1/2 cup bread crumbs
2 tbsp. ketchup
2 tbsp. Worcestershire sauce
1 tsp. mustard
1 tsp. dried parsley
1 clove garlic, finely minced
Salt and pepper to taste
Directions
Preheat oven to 350 degrees . Combine all ingredients in a large mixing bowl . Don't be shy: take off that bling and use your hands to combine the mixture well . Transfer combined mixture into a loaf pan . Bake at 350 for 50 minutes or until center is cooked thoroughly . Remove from oven and allow to rest for 5 to 10 minutes before serving
Dill Potatoes
Ingredients
4 cups new red potatoes, cubed
4 tbsp. fresh dill
1/4 cup milk
1 tbsp. butter
Salt and pepper to taste
Directions
Bring a pot of salted water to a boil . Add potatoes and boil until very tender . Drain potatoes . Return potatoes to pan and turn off the burner . Add dill, milk, butter, salt and pepper . Stir to combine well . Serve in individual bowls, pouring remaining milk/butter mixture from pan on top of each serving
Jul 27, 2009
Garlic Lime Chicken and Fresh Greens
This recipe gets a great review. From its simplicity to prepare to its full flavor and gorgeous color, it was an all-around star. I loved the caramel color the chicken took on after grilling and the aroma of limes was reminiscent of the shores of Mexico. Garlic Lime Chicken made me want to put on my chicest sundress and sip a Corona. I hope you enjoy this recipe as much as I did.
Ingredients
Serves two, but double the recipe for four
Two boneless, skinless chicken breasts (thawed)
1/4 cup soy sauce
4 tbsp. fresh or bottled lime juice
1/2 tbsp. ground mustard
1/2 tbsp. Worcestershire sauce
2 cloves garlic, roughly chopped
Directions
Mix soy sauce, lime juice, mustard, Worcestershire sauce and garlic . In a container with a lid (or plastic zipper bag), combine liquid with chicken breasts . Allow to marinade at least 30 minutes (I left mine 5 hours) . Remove chicken from marinade . Use a gas or charcoal grill OR a grill pan to cook chicken until no longer pink (approximately 6 to 8 minutes on each side depending on thickness)
Fresh Greens to Accompany Chicken
Ingredients
4 cups romaine lettuce, chopped
1 medium carrot, diced or cut into ribbons (using a peeler)
1/2 cup cooked corn (fresh, frozen or canned)
1/4 cup pepper jack cheese, shredded
Dressing of your choice (Note: pairs well with a Ranch-style dressing)
Garnished with lime wedges
Directions
Combine all ingredients . Enjoy
Apple Cinnamon Cheesecake
This is hands-down one of the most delicious cheesecakes I have ever created. It all began with my no-fail basic cheesecake recipe. Set on top a sweet, cinnamon crust, this creamy cheesecake topped with decadent cinnamon apples was decadent. The cinnamon and apples were reminiscent of harvest--I'll be sure to make this dessert again this fall. I accessorized my cheesecake with two cinnamon sticks.
Cheesecake Ingredients
2 cups finely-crushed vanilla wafer cookies1/4 cup butter or margarine, melted
1/2 tsp. cinnamon
2 packages (8 oz. each) cream cheese, softened
1/2 cup sugar
2 tsp. vanilla
2 large eggs
Making the Cheesecake
Heat oven to 350 degrees . In medium bowl, mix cookie crumbs, butter and cinnamon . Press firmly against bottom and sides of a 9 inch glass pie plate OR a spring form pan . In large bowl, beat cream cheese, sugar, vanilla and eggs with electric mixer on low speed until smooth . Pour mixture on top of crust in pie plate/pan . Bake 40 to 50 minutes or until center is set . Cool at room temperature for one hour . Top with apple cinnamon mixture
Topping Ingredients
5 apples, peeled and diced
1/2 cup sugar
2 tbsp. water
1 tbsp. lemon juice
1/4 tbsp. vanilla
1 tbsp. cinnamon (use more or less depending on how much spice you like)
2 tbsp. water
1 tbsp. cornstarch
Making the Topping
In a sauce pan, cook and stir diced apples, sugar, water, lemon juice, vanilla and cinnamon until boiling . Reduce heat . Cover and simmer for 5 minutes or until fruit is almost tender, stirring occasionally . Combine 2 tbsp. water and 1 tbsp. cornstarch and add to filling . Cook and stir until thickened and bubbly . Cool, then spoon evenly over cooked, cooled cheesecake
Simple Tip: Do not insert a knife into cheesecake because the hole may cause the dessert to crack as it cools.
Jul 25, 2009
Currently Craving
I posses and equal affinity for flashy high heels and flashy kitchen accessories. Just as slipping on a fabulous pair of shoes can transform your mood, using a fun, bright or bold kitchen tool will surely inspire some culinary creativity in your kitchen. The following are some colorful kitchen gadgets I'm currently craving:
Joseph Joseph Nesting Bowls: Conran USA . Digital Meat Thermometers: Sur la Table
Zak! Designs Happy Spoons: Kitchen Kapers
Joseph Joseph Nesting Bowls: Conran USA . Digital Meat Thermometers: Sur la Table
Zak! Designs Happy Spoons: Kitchen Kapers
Black Bean Tortilla Pie
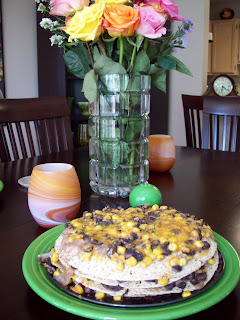
This recipe for this layered dish comes from the Martha Stewart website. It is a meatless main dish--a perfect vegetarian option. Black Bean Tortilla Pie was filling, easy-to-prepare and full of flavor.
Ingredients
4 (10-inch) flour tortillas
1 tablespoon canola oil
1 large onion, diced
1 jalapeno chile, minced (remove seeds and ribs for less heat) 2 cloves garlic, minced
1/2 teaspoon ground cumin
Coarse salt and ground pepper
2 cans (15 ounces each) black beans, drained and rinsed
12 ounces beer, or 1 1/2 cups water (I used water)
1 package (10 ounces) frozen corn (I used one can of corn)
4 scallions, thinly sliced, plus more for garnish
2 1/2 cups (8 ounces) shredded cheddar cheese
Directions
Preheat oven to 400 degrees . Using a paring knife, trim tortillas to fit a 9-inch springform pan, using the bottom of the pan as a guide . Set aside . Heat oil in skillet over medium heat . Add onion, jalapeno, garlic and cumin; season with salt and pepper . Cook, stirring occasionally, until onion is softened, 5 to 7 minutes . Add beans and beer (or water) to skillet and bring to a boil . Reduce heat to medium; simmer until liquid has almost evaporated, 8 to 10 minutes . Stir in corn and scallions and remove from heat . Season with salt and pepper . Fit a trimmed tortilla in bottom of springform pan; layer with 1/4 of the beans and 1/2 cup cheese . Repeat three times, using 1 cup cheese on top layer . Bake until hot and cheese is melted, 20 to 25 minutes. Unmold pie; sprinkle with scallions . To serve, slice into wedges
Jul 24, 2009
Golabki
The preparation of this dish is a tribute to my Polish grandmother. I grew up savoring this dish at our large family get-togethers and its taste takes me back to such times. Although the recipe is not my grandmother's, it was absolutely delicious. The savory filling wrapped in tender cabbage and topped with tomatoes was pure comfort. This recipe is compliments of Emeril Lagasse of Food Network.
Ingredients
1 small whole white cabbage
2 tablespoons butter
1 pound ground beef
Salt
Freshly ground black pepper
1 cup chopped onions
2 cups cooked, long-grain white rice
1 egg
1 teaspoon finely chopped parsley leaves
1/4 cup water
For the sauce:
2 tablespoons butter
2 tablespoons flour
1 cup peeled, seeded and chopped tomatoes
1 teaspoon chopped garlic
Pinch of sugar
Salt
Freshly ground black pepper
1 cup chicken stock
1/2 teaspoon dried thyme
Directions
Cut the cabbage in half lengthwise and remove the core . Peel a couple of the outer leaves away from the cabbage halves and discard. Bring a pot of salted water to a boil . Add the cabbage and cook for 20 minutes or until tender . Remove from the water and cool completely . Carefully divide into individual leaves (eight whole leaves are needed) . Set aside . In a large saute pan, over medium heat, melt the butter . Add the meat. Season with salt and pepper . Brown the meat for 5 minutes . Add the onions . Season with salt and pepper . Continue to cook for 4 minutes, or until the onions are translucent . Remove from the heat and turn into a mixing bowl . Cool slightly . Stir in the rice, egg and parsley . Mix well. Season with salt and pepper . Preheat the oven to 375 degrees . place 1/2 cup of the meat and rice mixture in the center of each cabbage leaf . Roll up each leaf tightly . Place in a shallow baking pan, add the water and cover with foil . Bake for 30 minutes . In a saucepan, over medium heat, melt the butter . Stir in the flour and cook for 4 minutes for a blonde roux . Stir in the tomatoes, garlic and sugar . Season with salt and pepper . Continue to cook for 2 minutes . Stir in the stock and the thyme . Bring the liquid to a boil, reduce to a simmer and continue to cook for 15 minutes or until the sauce coats the back of a spoon . To serve, spoon the sauce over each cabbage roll
Potato Pizza
When speaking of pizza, it really doesn't get much simpler than this. My recipe is adapted from a phenomenal little cookbook called The Book of Pizzas and Italian Breads by Sarah Bush. The pizza was very flavorful, hearty and offered my palate something different.
Two packages of store-bought pizza crust mix (I chose Betty Crocker and will note that I added some garlic seasoning to the crust when kneading)
8 small potatoes, peeled
Dash of salt
1 cup pizza sauce (use any you like)
1/2 cup shredded cheddar cheese
Preparing Your Pizza
Cook potatoes in salted boiling water in a medium saucepan 10 to 15 minutes . Drain, cool slightly, then slice thinly . Meanwhile, preheat oven to 425 degrees . Prepare your dough according to the package directions . Prepare your pizza pan, if necessary (stones and non-stick options don't need greased) . Roll out dough into round shape and place on pizza pan . Spread pizza sauce over dough . Arrange potato slices on top . Sprinkle with salt . Top with cheese . Bake approximately 20 minutes or until crust is golden . Serve and enjoy
Watermelon Granita
I discovered the recipe for this simple, refreshing granita while flipping through an issue of Country Living Magazine. Unlike other granitas, with this recipe there is no need to turn on your stovetop. Additionally, it freezes quickly and looks gorgeous served in a martini glass. For the adults, a splash of vodka makes this icy treat even more delectable.
Ingredients
Ingredients
4 cups cubed fresh watermelon
1/2 cup sugar
1/2 cup sugar
2 tbsp. lime juice
Making Your Granita
Purée all ingredients in a blender . Pour into a 9-by-13-inch dish (I used a deep cookie sheet) and place in the freezer . Stir with a fork every 30 minutes until mixture is slushy (up to 2 1/2 hours)
Simply Delicious Baked (Whole) Chicken
Ingredients
1 whole chicken
1 tbsp. olive oil/butter
4 garlic cloves
1 tbsp. dried sage
1 tsp. dried rosemary
1 tsp. kosher/sea salt (table salt will work, also)
½ tsp black pepper
1 cup water (chicken/vegetable broth can be used also)
Preparing the bird
First allow the chicken to defrost completely . Next, remove innards/giblets/etc. from the cavity of the bird . Rinse chicken (outside and in) with cool, tap water . Pat chicken dry with a paper towel
Baking the bird
Pre-heat your oven to 500 degrees. In a roasting pan, pour water and layer with vegetables (vegetables are optional) . Set aside . Cut several slits in the chicken skin and place garlic cloves in the slits (I like to distribute them in various places around the bird and even place one in the cavity) . Massage olive oil/butter into the skin of the chicken (yes, I said massage) . Evenly distribute sage, rosemary, salt and pepper on the outside of the bird . Place bird on top of vegetables in roasting pan . Turn oven temperature to 350 degrees and place chicken in oven . Cook for 1 and ½ hours (until internal temperature of bird reaches 165 degrees--using meat thermometer) . When chicken is thoroughly cooked, remove from oven and allow to rest for ten minutes . Savor the fruits (or bird) of your labor
A Simple Note Regarding Food Safety
Cooking and enjoying a delicious chicken dinner should be just that—enjoyable. To avoid any food safety kitchen conundrums, check out this extremely helpful website from the USDA. Whether you’re new to cooking or need to brush up on your knowledge of safe food handling, there is a plethora of great information to ensure a happy, healthy kitchen (and tummy).
http://www.fsis.usda.gov/Fact_Sheets/Chicken_Food_Safety_Focus/index.asp
Subscribe to:
Posts (Atom)